Wednesday, 30 March 2011

Sri Lanka wins the 1st Semi Final looking for thr Champion Trophy

Sri Lanka's Malinga and Dilshan pose with the 2011 Cricket World Cup Trophy during a media conference in Colombo
Sri Lanka's Malinga and Dilshan pose with the 2011 Cricket World Cup Trophy during a media conference in Colombo 
 
Sri Lanka Wins the 1st semi final of cricket world cup 2011 play in Colombo after defeating New Zealand by 5 Wicks...

Sri Lanka is looking for Champion trophy, it will face which team, it will decided after tomorrows match.
Pakistan VS India Live tomorrow 2nd semi final of Cricket world cup 2011 in mohali, very hot match and very tuff competitors.


Sunday, 27 March 2011

Adobe Photoshop & Photoshop Elements Tips Retouching Tools In Adobe Photoshop

The retouching tools in Adobe Photoshop are: Clone Stamp, Pattern Stamp, Healing Brush, Patch and Color Replacement.
These tools repair damaged images, apply repeated patterns, or replace colors in an image.
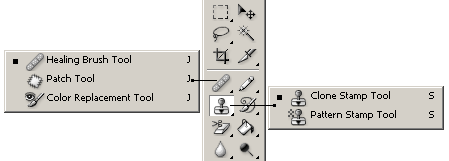
The following illustration shows the arrangement of these tools in the toolbar.
Arrangement On The Toolbar
If two or more tools occupy the same cell (the icon for the tool last used is always shown), in order to choose another tool, right-click the mouse on the arrow next to the icon and and choose another tool from the menu that appears. This menu will also appear if you click on the icon and press it for some time.
The Clone Stamp tool and Healing Brush clone (copy) pixels from one part of an image to another, to another layer or even to another image. The difference between the Healing Brush and the Clone Stamp tool is, the Healing Brush in Photoshop takes into account the texture, illumination and shadows of the processed image. As a result, the fragment processed by the Healing Brush blends more easily into the rest of the image.
To clone an area with the Clone Stamp or Healing Brush, follow these steps:
  • Step 1. Choose the tool from the Toolbar.
  • Step 2. Set the parameters for the tool in the Options panel: size, blending mode, the amount of opacity and others.
  • Step 3. Check Use All Layers, if you need to work with several layers at once.
  • Step 4. Check Aligned to create one clone selected from the area around a starting point. The mouse button can be released and new fragments selected. Also, the mode and size of the tool can be changed. If Align is unchecked, then each application of the tool will create a clone from the same starting point.
  • Step 5. Set a starting point. Do this by holding ALT, and then left-clicking on the point from which the clone will be taken.
  • Step 6. Move the cursor to the location where you want to copy the fragment.
  • Step 7. Press the left mouse button and the clone will be applied. If the Healing Brush is used, then the cloned fragments, texture, luminance, and shadows, will be processed in relation to the pixels of the background image.
The Patch tool repairs an area with pixels copied from another area or image. Like the Healing Brush, the Patch takes into account the texture, luminance, and shadows of the background image.
This tool can be used in one of two ways:
Define the place where the clone will be applied, then drag the tool to the source point.
Follow these steps:
  • Step 1. Choose the Patch tool from the Toolbar.
  • Step 2. Choose the shape and size of the tool in the Options panel, and select Source in Patch's options.
  • Step 3. Draw a line with the Patch tool around the part of the image that needs to be restored.
  • Step 4. Drag the selected area to a new spot, from which the clone will be created.
Define the source, then drag the tool to the damaged area.
Follow these steps:
  • Step 1. Choose the Patch tool from the Toolbar.
  • Step 2. Choose the tool's size and shape in the Options panel, and in Patch's options select Destination.
  • Step 3. Draw a line with the Patch tool around the part of the image that will be cloned.
  • Step 4. Drag this area over the part of the image that needs repair.
The Pattern Stamp tool works by drawing with a repeating pattern. This tool can be used to created a frame or design for wallpaper or for retouching the texture of part of an image. A pattern is selected from the Pattern Palette in the Options Panel.
To use this tool, follow these steps:
  • Step 1. Choose the tool from the Toolbar.
  • Step 2. Set a pattern, by choosing it from the Pattern Palette in the Options Panel.
  • Step 3. Choose the size and shape, blending mode, amount of pattern opacity and other parameters for the tool in the Options Panel.
  • Step 4. Press the left mouse button and drag the tool into the image.
A repeating pattern can also be used with the Healing Brush and Patch tool. To do this with the Healing Brush, in the tool's options select Pattern for the Source and choose a pattern from the Pattern Palette. To do this with the Patch tool - begin by using the tool to draw a line around an area (or use a previously selected area), then choose a pattern from the Pattern Palette and press the Use Pattern button.
The Color Replacement tool replaces one color in an image with another. This tool can be used, for example, to repair the "red eye" effect.
Follow these steps to use the tool:
  • Step 1. Choose the tool from the Toolbar.
  • Step 2. Set the color which will be used to replace the intended color in the image.
  • Step 3. Set the parameters for the tool in the Options Panel, such as: size and shape of the brush, the color's blend mode, color choice mode, opacity, etc.
  • Step 4. Click on the color in the image to be replaced.

Adobe Photoshop & Photoshop Elements Tips Rotation and flipping in Adobe Photoshop

To rotate an image in Adobe Photoshop you can use commands from the submenu Image - Rotate Canvas.
You can apply the following commands:
  • 180° - it rotates the image by 180 degrees.
  • 90° CW - it rotates the image by 90 degrees clockwise.
  • 90° CCW - it rotates the image by 90 degrees anticlockwise.
  • Arbitrary - this command rotates the image by an arbitrary angle. For this purpose:
    • Step 1. select the command from the menu;
    • Step 2. enter the value of the rotation angle in degrees;
    • Step 3. specify the direction of the rotation - clockwise or anticlockwise;
    • Rotate canvas: arbitrary rotation
    • Step 4. press the button OK.
To flip an image in Adobe Photoshop you can use the following commands from the menu Image - Rotate Canvas:
  • Flip Horizontal - it mirrors the image as to the standing axis, i.e. interchanges the left and the right parts of the image;
  • Flip Vertical - it mirrors the image as to the horizontal axis, i.e. it turns the image upside down.

Adobe Photoshop & Photoshop Elements Tips Perspective Distortion Correction

Sometimes our lens distorts the perspective in the image.
You can correct perspective distortions of an image using the Adobe Photoshop Crop tool.

All you have to do is:
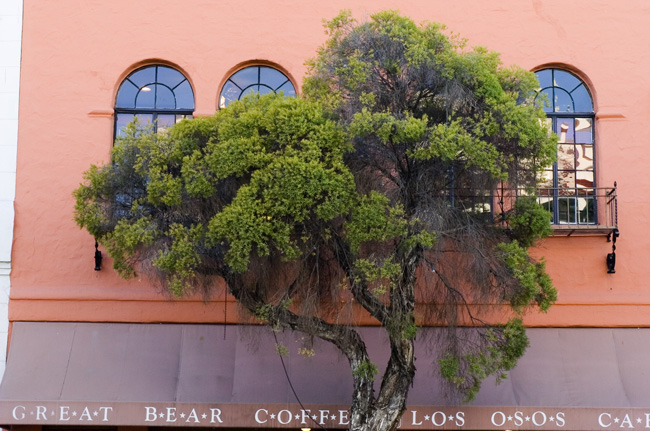
  • Step 1. Open the photo in Adobe Photoshop.
    A tree against the wall
  • Step 2. Choose the Crop tool in CS2 Tools panel.
    Tools palette fragment with Crop chosen
  • Step 3. Create a marquee by dragging the tool cursor over the image.
    The marquee is drawn
  • Step 4. In the Options bar check Perspective box (if it is unchecked).
    Crop options bar
     
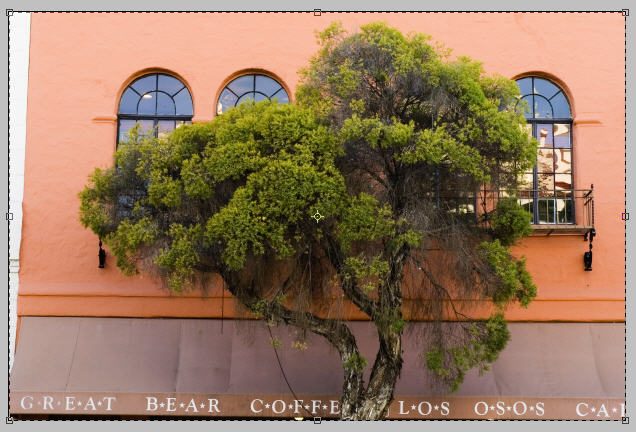
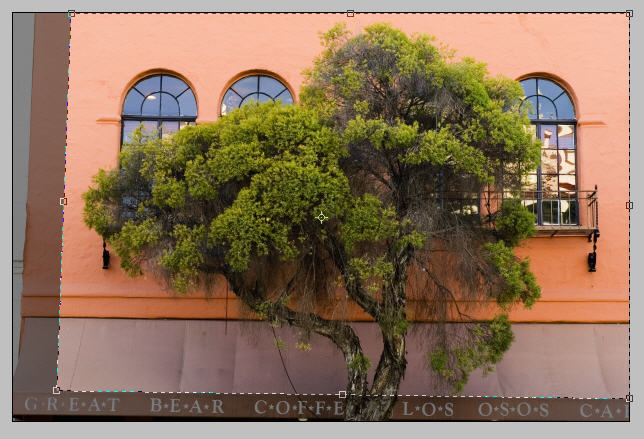
  • Step 5. By dragging the corners of the marquee (they can be moved independently in this mode) line the marquee borders with the actually vertical and horizontal lines of the image.
    Correcting perspective
  • Step 6. Adjust the marquee to the desired size.
    Adjusting the frame
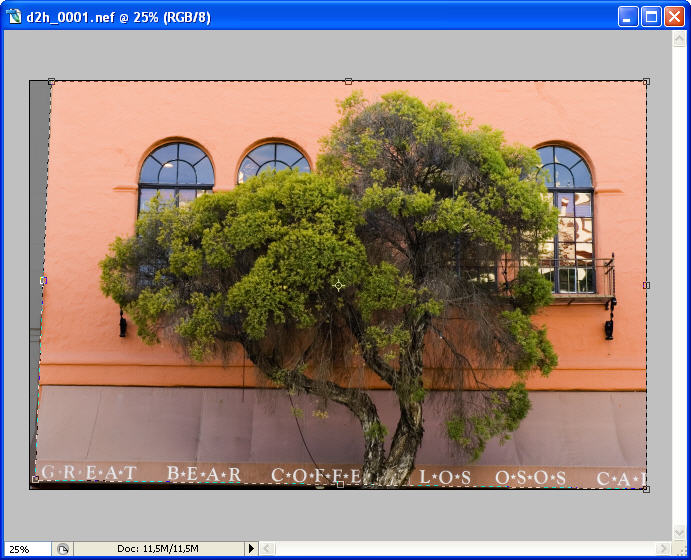
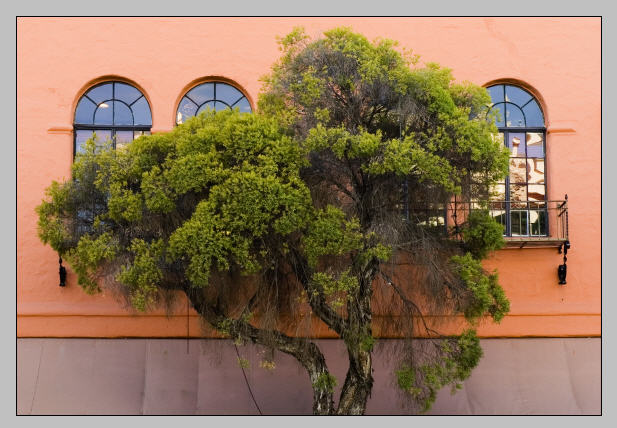
  • Step 7. Press Enter key or Commit button in the Options bar. The resulting image will be rectangular and have no distortions..
    Final image

Adobe Photoshop & Photoshop Elements Tips Cropping An Image In Adobe Photoshop

Cropping - This changes the number of pixels in an image by "cropping" away the pixels from the surrounding area.
In the photo editor Adobe Photoshop an image can be cropped with the Crop tool or the Crop command.
To crop an image with the Crop tool, follow these instructions:
  • Step 1. Choose the Crop tool Crop Tool from the Tool Panel or press C.
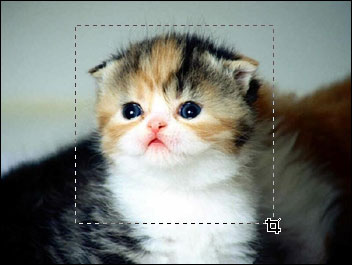
  • Step 2. Bring the cursor to a point on the image, where a corner of the cropped image will be, and left-click the mouse.
  • Step 3. Moving the cursor diagonally, keep the left mouse button pressed.
  • Selecting an Area to Crop
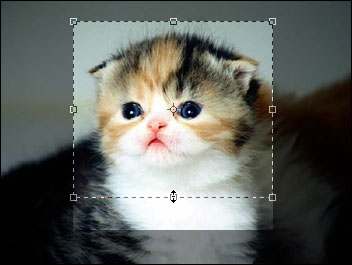
  • Step 4. Release the left mouse button. A box will appear over the image with marked corners, indicating the area that will be preserved. This box can be moved, resized, and rotated.
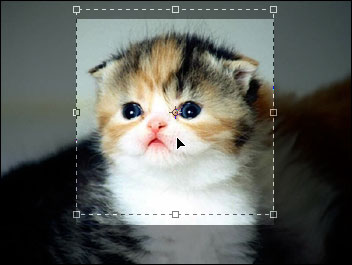
    • To move the crop box move the cursor completely inside the selected area, press the left mouse button, and while keeping the left mouse button pressed, drag the box.
    Moving the Crop Box
    • To change the size of the selected area move the cursor to one of the corner markers, press the left mouse button and drag the marker. If the cursor is dragged while pressing Shift, the size of the box will be changed proportionally.
    Changing the Size of the Crop Selection Box
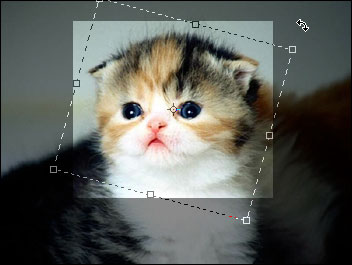
    • To rotate the crop box move the cursor to one of the corner markers and drag the cursor.
    Rotating the Crop Selection Box
  • Шаг 5. Press Enter (Return on Macintosh) or press the Apply button in the Options Panel to crop the image. To close the crop box without cropping the image press Esc or press the button in the Options Panel.

To crop an image with the Crop command from the Photoshop menu, follow these steps:
  • Step 1. Choose the Rectangular marquee tool from the Tool Panel.
  • Step 2. Select a rectangular area on the image Selection Tools in Adobe Photoshop).
  • Step 3. Choose Crop from the Image menu.

Adobe Photoshop & Photoshop Elements Tips Transformation of inserted objects in Adobe Photoshop


  • Moving an object in Adobe Photoshop To move an object we can either move the layer with the inserted object, or select a layer fragment and move this immediate fragment.
    Select the Move Move Tool tool from the Toolbar to move the layer or its fragment.
    First of all, activate the layer with the inserted object and follow the instructions:
    • Step 1. If you want to move a fragment of the layer not the layer itself, you can select the necessary area using any selection tool.
    • Step 2. Select the Move tool from the Toolbar.
    • Step 3. Bring the cursor inside the selected fragment to move it or on any point of the layer to move the layer itself.
    • Step 4. Drag the object. For this purpose press the left mouse button and keeping it pressed drag the mouse cursor.
  • Transformation of objects in Adobe Photoshop photo editor After an object is inserted in a new layer, we can use Layer transformation commands to transform the object. To transform the layer or the selected fragment we can use one of the commands from the menu Edit - Transform. For example, the following commands: Scale, Rotate, Skew, Distort, Perspective, Rotate 180°, Rotate 90° CW, Rotate 90° CCW, Flip Horizontal, Flip Vertical.
    You can also use the command Free Transform from the Edit menu, which will help you to perform all transformations at one time. If you select the command Edit – Free Transform, the layer or the selected fragment will be enclosed in a frame with eight markers, and in the Options palette a number of parameters for adjustment will appear.
    Options palette in Adobe Photoshop
    Scale – to adjust the scale of the image within the area you should move one of the eight markers. To change the scale proportionally you should drag the marker in the corner keeping the Shift key pressed. You can enter values for the W and H parameters in percentage from the original size directly in the Options palette. For the size to be changed proportionally, you should activate the relation sign between the W and H parameters.
    Flip – to flip an image you should move one of the markers behind the opposite marker. For example, if you drag the left marker all the way to the right side of the right marker, the image will flip horizontally. However, if all you want is to flip the image, you'd better use the commands Flip Horizontal and Flip Vertical from the menu Edit – Transform.
    Rotate – to rotate an image you should bring the cursor to the marker in the corner so that the cursor transforms in a two-side rounded arrow, press the left mouse and keeping it pressed, drag the cursor. You can set the rotation angle in the Options palette using the Rotate parameter.
    Skew – to skew an image you should drag the marker on the side, the upper and the lower marker keeping the Ctrl key pressed (Command in Macintosh). You can adjust the Skew transformation option in the Options palette setting the H and V parameters.
    Distort – it is possible to distort an image by dragging a corner marker keeping the Ctrl key pressed (Cmd in Macintosh).
    Perspective – to create a perspective you should drag a corner marker keeping the Ctrl and Shift keys pressed (Cmd and Shift in Macintosh).
    If you want to drag two points at a time, you should drag a corner marker keeping the Ctrl, Alt and Shift keys pressed (Cmd, Option and Shift in Macintosh).
    To confirm the transformation press Enter (Return in Macintosh) or double-click with the left mouse button inside the object. You can as well press the button Apply in the Options palette.
    To cancel the transformation press Esc or the button Cancel in the Options palette.

Adobe Photoshop & Photoshop Elements Tips Selection Shading

Whether you've made a selection with Photoshop tools or used a plugin you'd want your selection to look nice and smooth on a new background. This happens when the edges of the object blend with the background colors. If the edges of the selected image were not softened or feathered during the process of selection you may shade them in Photoshop.
All you have to do is:
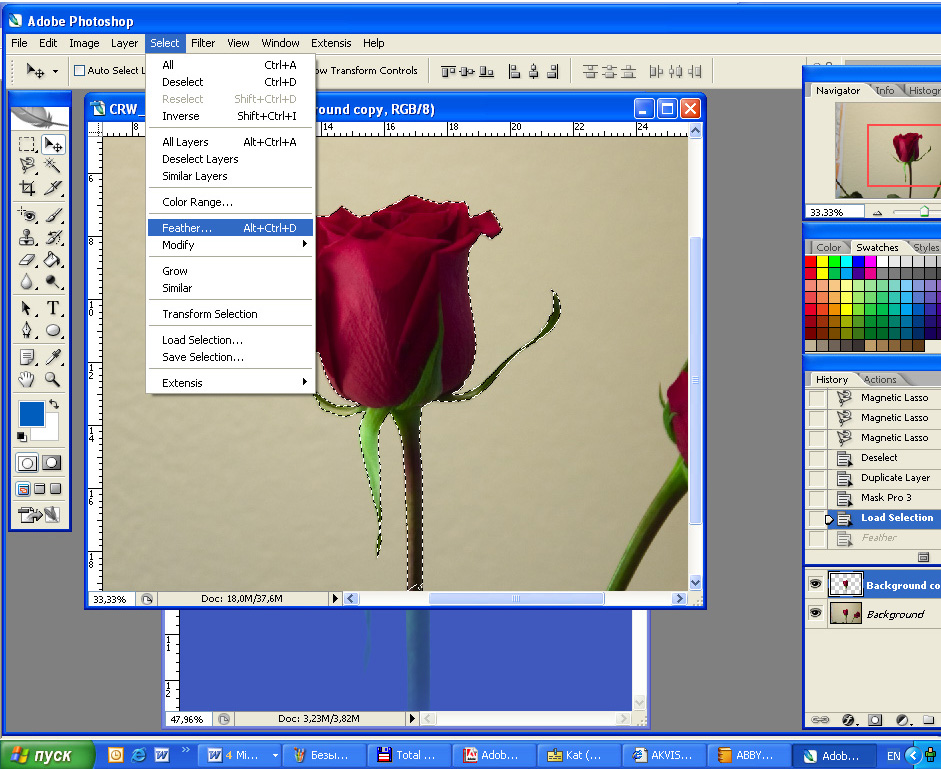
  • Step 1. In Adobe Photoshop have your selection loaded. Open Select menu and choose Feather.
    Select menu in Adobe Photoshop
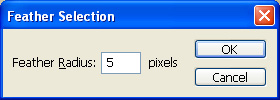
  • Step 2. In the opening dialogue window type in a number of pixels to be feathered (2-5 are usually enough).
    Feather selection
  • Step 3. Now you can copy your selection, paste it into a new environment and evaluate the result.
    Unshaded rose
    No shading
    Rose shading 5 px
    5 px shading
    Rose shading 15 px
    15 px shading
    Rose shading 50 px

Adobe Photoshop & Photoshop Elements Tips Adobe Photoshop Selection Tools


Adobe Photoshop also offers a number of selection tools: Quick Mask, Rectangular marquee, Elliptical marquee, Lasso, Polygonal Lasso, Magnetic Lasso, Magic Wand.
The most efficient way to make a selection in Adobe Photoshop is to use Quick Mask mode.

  • Quick Mask mode
  • To switch from Standard mode to Quick Mask mode, press the button Quick Mask mode in the lower part of the Toolbox or use a hot key Q. Paint over the areas to be selected with a hard edge Brush (in Quick Mask mode the selected area is highlighted in semi-transparent red) Then switch back to Standard mode by pressing the button Standart mode in the lower part of the Toolbox and invert the selection using the command Select -> Inverse. It is critical to invert the selection as in Quick Mask mode it is the unpainted area that falls into the selection.   Note that if you set Selected Areas in the Quick Mask Options (opened by double clicking on the Quick Mask button), you do not need to invert the selection. Also, you can change the highlight color and its opacity here.
      Hints on the Quick Mask Options:: Open the Options by double clicking on the Quick Mask button.
    • if the "Masked Areas" option is active the areas non marked with red will be selected
    • if the "Selected Areas" option is active the areas marked with red will be selected
 
The Rectangular marquee and Elliptical marquee tools are hidden in the Toolbox under one and the same icon. The icon on the Toolbox displays the last tool used. To open the floating menu right-click on the arrow in the lower right corner of the displayed icon.

The Rectangular marquee and Elliptical marquee tools

  • Rectangular marquee
  • This tool selects rectangular and square areas. To select a rectangular area you should:
      Step 1. Activate the Rectangular marquee tool by clicking on the icon The Rectangular marquee tool, or (if the Rectangular marquee was not the last tool applied) select it from the floating window. Step 2. Bring the mouse cursor to the point of the image where the corner of an imaginary rectangle should be, and press the left mouse button. Step 3. Keeping the left button pressed, move the cursor diagonally to the opposite corner and release the button.
    To select a square area of the image make a selection keeping the Shift key pressed. Take into account that if you already have a selected area the new selection will be added to the previous one. To avoid it you should press the Shift key only when you start selecting a new area.
  • Elliptical marquee
  • This tool selects ellipses and circles. To select an elliptical area you should:
      Step 1. Select the Elliptical marquee tool from the Toolbox by clicking on the icon The Elliptical marquee tool , or (if the Elliptical marquee was not the last tool applied) select it from the floating window. Step 2. Bring the mouse cursor to the point of the image where the corner of an imaginary rectangle with an inscribed ellipse should be, and press the left button. Step 3. Keeping the left button pressed, move the cursor diagonally to the opposite corner and release the button.
    To select a circular area of the image make a selection keeping the Shift key pressed. Take into account that if you already have a selected area the new selection will be added to the previous one. To avoid it you should press the Shift key only when you start selecting a new area. If you keep the Alt (Option in Macintosh) key pressed when selecting an elliptical or a rectangular area, the selection is generated from the center to borders, not from one corner to another.

The Lasso, Polygonal Lasso, Magnetic Lasso tools are hidden in the Toolbox under one and the same icon. The icon on the Toolbox displays the last tool selected. To open the floating menu right-click on the arrow in the lower right corner of the displayed icon.
The Lasso, Polygonal Lasso, Magnetic Lasso tools

  • Lasso
  • The tool allows creating freehand selections. To make a freehand selection you should:
      Step 1. Select the Lasso tool from the Toolbox by left-clicking on the icon Lasso tool, or (if Lasso was not the last tool applied) select it from the floating window. Step 2. Bring the mouse cursor to the object that must be selected and outline it keeping the left button pressed.
  • Polygonal Lasso
  • The tool makes freehand selections, but its contour is made up of straight segments. To make a selection you should:
      Step 1. Select the Polygonal Lasso tool from the Toolbox by clicking on the icon The Polygonal Lasso tool, or (if Polygonal Lasso was not the last tool applied) select it from the floating window. Step 2. Bring the cursor to any point near the object to be outlined and press the left mouse button - it'll be the first point of the contour. Step 3. Move the cursor to the next point of the contour not far from the first one and left-click it again. The program will automatically draw a straight line between the two points. Step 4. Keep putting points in this way until the whole object is outlined and close the contour.
  • Magnetic Lasso
  • This tool makes a freehand selection. When you use Magnetic Lasso you do not need to follow the contour of the object precisely. If the object stands out against the background the border of the selected area will be traced automatically as you move the cursor along the object. To select an area using Magnetic lasso you should:
      Step 1. Select the Magnetic Lasso tool from the Toolbox by clicking on the icon The Magnetic Lasso tool, or (if Magnetic Lasso was not the last tool applied) select it from the floating window. Step 2. Bring the mouse cursor to the border of the object that should be selected. Step 3. Press the left button and start dragging the cursor along the object. Pay attention to fastening points that appear as you outline the object and when you male a click. If a fastening point is irrelevant you can remove it by pressing the Delete key and return to the previous fastening point to continue outlining the object. Step 4. Close the contour, that is join the first fastening point with the last one by bringing the cursor to the first point or by making a double-click.
  • Magic Wand
  • This tool selects a consistently colored area. You can set Tolerance in the Options palette of the Magic Wand tool. The higher is the value, the more colors will fall into the selected area. The Tolerance value ranges from 0 to 255. At Tolerance equal to 0 the selected area will be represented only by one color, at Tolerance equal to 255 - all colors of the image will be selected, that is the whole image. To select a consistently colored area, you should: Step 1. Select the Magic Wand tool in the Toolbox by clicking the icon The Magic Wand tool. Step 2. Bring the cursor to the pixel of the image that must be included into the selection and left-click it. As a result an outline appears around the pixel. It includes colors of the image similar to the color of the selected pixel according to the specified Tolerance value.

These selection tools are efficient due to the flexibility of their usage: you can add to, subtract from or intersect a selection.
To add an area to the previous selection you should press the Shift key before you use a selection tool and, keeping it pressed, make a new selection.
To subtract an area from the previous selection you should press the Alt (Option in Macintosh) key before you use a selection tool and, keeping it pressed, make a new selection.
If you press Shift and Alt (Shift and Option in Macintosh) keys simultaneously you obtain an intersection of the old and new selections.

A Watercolor Painting out of a Photo

The author of this example K.J. Hartmann writes:
I tried many times to convert a photo to sketch or drawing using different programs but I was not always satisfied with the final image. Now I'm using AKVIS Sketch and I'm very delighted with the result!
For this tutorial I used AKVIS Sketch and one of the standard Adobe Photoshop filters. I will show you how to convert a photo into work of art.
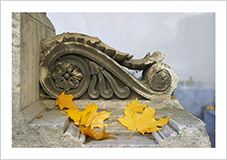
    Original autumn photo Watercolor painting
    Source autumn photo Watercolor painting
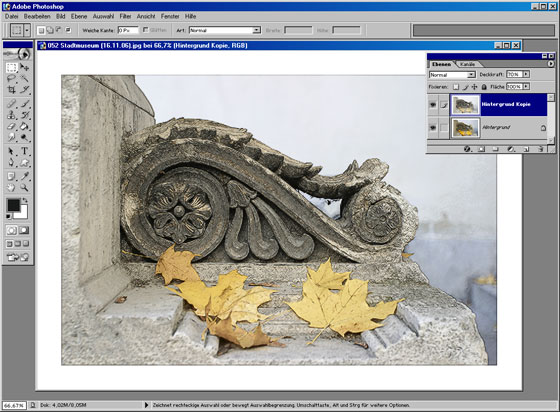
  • Step 1. Open the image in Adobe Photoshop and duplicate this image to get one more layer (Layer -> Duplicate layer (Ctrl+J). By default the upper layer is selected and we start working with it.
    Autumn picture: two layers
  • Step 2. Call the plugin (Filters->AKVIS->Sketch).
  • Step 3. Set the parameter Coloration in the Effects panel to 40. Press the button Run. The After tab shows the resulting pencil sketch.
    Pencil sketch
  • Step 4. To apply the result press the button . Here is the pencil sketch that we have on the second layer of our image.
    Autumn picture: pencil sketch
  • Step 5. Now deactivate the visibility of the second layer with a double-click on the eye icon near the layer in the Layers palette. We need it to see the result of our manipulations with the lower layer. Then activate the lower layer (background layer) and work with it.
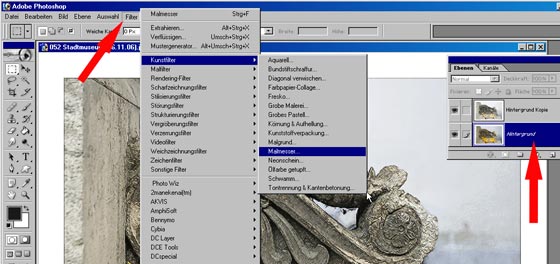
  • Step 6. Call Filter->Artistic->Palette Knife on the background layer and set the parameters as you like.
    Filter Palette Knife
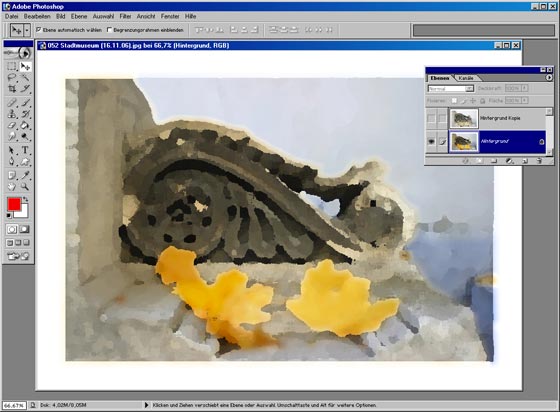
    The result will be similar to the following picture:
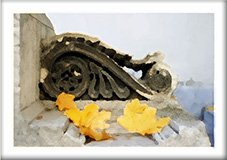
    Painting effect
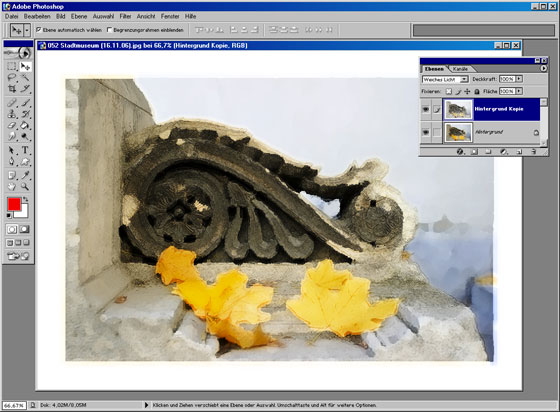
  • Step 7. Activate the visibility of the first layer with a double-click on the eye icon in the Layers palette. Choose the blend mode Soft light in the drop-out menu of the Layers palette.
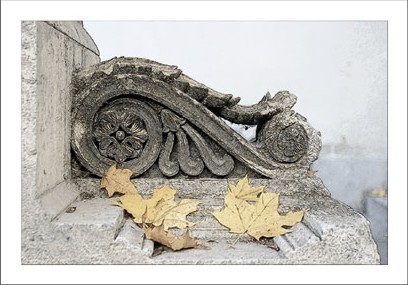
    Autumn painting
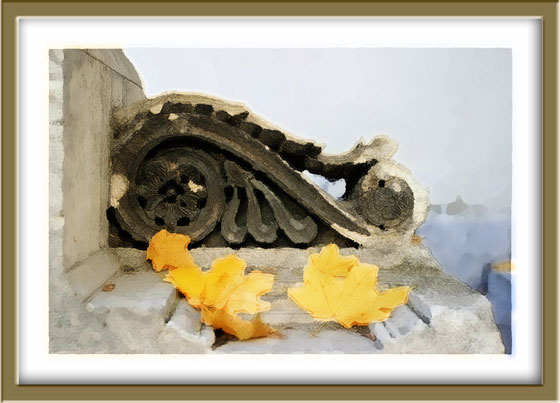
    The picture will look well in a photo frame. You can try AKVIS ArtSuite for this purpose.
    Watercolor painting in a  frame